Pages

Monday, December 30, 2013

Custom Application Development in Oracle E-Business Suite (EBS) R12


1.    Create Application User in Oracle EBS
Log in to EBS as Username sysadmin
Navigation: System Administrator > Security > User > Define
User Name: XXJS
Password: xxjs
Add following as Responsibility: Application Developer


View just created user by using sqlplus:
[oraerp@ebsr12 ~]$ sqlplus apps/apps
SQL>SELECT * FROM fnd_user WHERE USER_NAME='XXJS';

2.    Log in to EBS as new user (XXJS)
Here you are able to view two responsibilities after login.

3.    Create Oracle Database User “XXJS” in Oracle EBS
[oraerp@ebsr12 ~]$ sqlplus system/manager
      3.1 Create Tablespace
SQL>CREATE TABLESPACE xxjs_ts datafile '/u01/oraR12/db/apps_st/data/xxjs01.dbf' size 500M;
      3.2 Create User
SQL>CREATE USER xxjs identified by xxjs DEFAULT TABLESPACE XXJS_TS TEMPORARY TABLESPACE TEMP QUOTA UNLIMITED ON XXJS_TS ;
SQL>GRANT CONNECT, RESOURCE TO xxjs;
SQL>CONNECT xxjs/xxjs
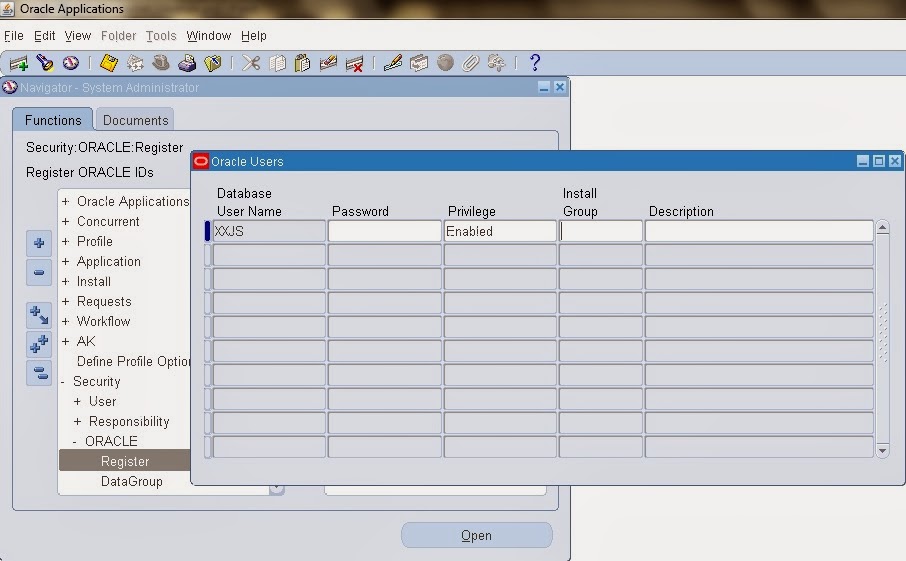
4.    Register Oracle schema “XXJS” to EBS
Navigation: System Administrator > Security > ORACLE > Register
User Name: xxjs
Password: xxjs
Privilege: Enabled
Note: Ensure User Name and Password same as Database username and password which is already created.


5.    Create directory structure for Custom Top of new Application “xxjs”
5.1 Create a folder called “xxjs” under APPL_TOP (i.e. /u01/applR12/apps/apps_st/appl/ in my case) in Linux
[oraerp@ebsr12 ~]$ su - applerp
[applerp@ebsr12 appl]$ cd $APPL_TOP
[applerp@ebsr12 appl]$ pwd
/u01/applR12/apps/apps_st/appl
cd $APPL_TOP
[applerp@ebsr12 appl]$
[applerp@ebsr12 appl]$ mkdir xxjs/12.0.0
[applerp@ebsr12 appl]$ mkdir xxjs/12.0.0/admin
[applerp@ebsr12 appl]$ mkdir xxjs/12.0.0/admin/odf
[applerp@ebsr12 appl]$ mkdir xxjs/12.0.0/admin/sql
[applerp@ebsr12 appl]$ mkdir xxjs/12.0.0/bin
[applerp@ebsr12 appl]$ mkdir xxjs/12.0.0/forms
[applerp@ebsr12 appl]$ mkdir xxjs/12.0.0/forms/US
[applerp@ebsr12 appl]$ mkdir xxjs/12.0.0/lib
[applerp@ebsr12 appl]$ mkdir xxjs/12.0.0/log
[applerp@ebsr12 appl]$ mkdir xxjs/12.0.0/mesg
[applerp@ebsr12 appl]$ mkdir xxjs/12.0.0/out
[applerp@ebsr12 appl]$ mkdir xxjs/12.0.0/reports
[applerp@ebsr12 appl]$ mkdir xxjs/12.0.0/reports/US
[applerp@ebsr12 appl]$ mkdir xxjs/12.0.0/sql
5.2 Add Base Path of custom module into the environment
[oraerp@ebsr12 ~]$ su - applerp
[applerp@ebsr12 xxjs]$ export XXJS_TOP=/u01/applR12/apps/apps_st/appl/xxjs/12.0.0

6.    Register new custom application in EBS
Navigation: System Administrator > Application > Register
Application: XXJS Custom Application
Short Name: XXJS
Basepath: XXJS_TOP
Description: XXJS Custom Application

[oraerp@ebsr12 ~]$ sqlplus xxjs/xxjs
SQL>SELECT * FROM fnd_application WHERE application_short_name='XXJS';

7.    Create a Menu for XXJS Custom Application
Navigation: System Administrator > Application > Menu
Menu: XXJS_MENU
User Menu Name: XXJS Custom Application Menu
Description: XXJS Custom Application Menu
Seq
Prompt
Submenu
Function
Description
Grant
100
View Requests
View All Concurrent Requests
View Requests
Tick
200
Submit Requests
Requests: Submit
Submit Requests
Tick


       [oraerp@ebsr12 ~]$ sqlplus xxjs/xxjs
SQL>SELECT * FROM fnd_menus WHERE menu_name='XXJS_MENU';
SQL>SELECT * FROM fnd_menu_entries WHERE menu_id = (SELECT menu_id FROM fnd_menus WHERE menu_name='XXJS_MENU');
SQL>SELECT * FROM fnd_menu_entries_vl WHERE menu_id = (SELECT menu_id FROM fnd_menus WHERE menu_name='XXJS_MENU');

8.    Attach custom module to Data Group
Navigation: System Administrator > Security > ORACLE > DataGroup
Data Group: Standard
Description: Standard Data Group
Application: XXJS Custom Application
Oracle ID: APPS


9.    Create Request Group
Navigation: System Administrator > Security > Responsibility > Request
Group: XXJS Request Group
Application: XXJS Custom Application
Code: XXJS
Description: XXJS Custom Requests


[oraerp@ebsr12 ~]$ sqlplus xxjs/xxjs
SQL>SELECT * FROM fnd_request_groups WHERE request_group_name='XXJS Request Group';

10.  Create responsibility
Navigation: System Administrator > Security > Responsibility > Define
Responsibility Name: XXJS Custom
Application: XXJS Custom Application
Responsibility Key: XXJSCUSTOM
Description: XXJS Custom Responsibility
Menu: XXJS Custom Application Menu
Data Group Name: Standard
Request Group Name: XXJS Request Group


[oraerp@ebsr12 ~]$ sqlplus xxjs/xxjs
SQL>SELECT * FROM fnd_responsibility WHERE responsibility_key='XXJSCUSTOM';
SQL>SELECT * FROM fnd_responsibility_tl WHERE responsibility_name like'XXJS Custom';

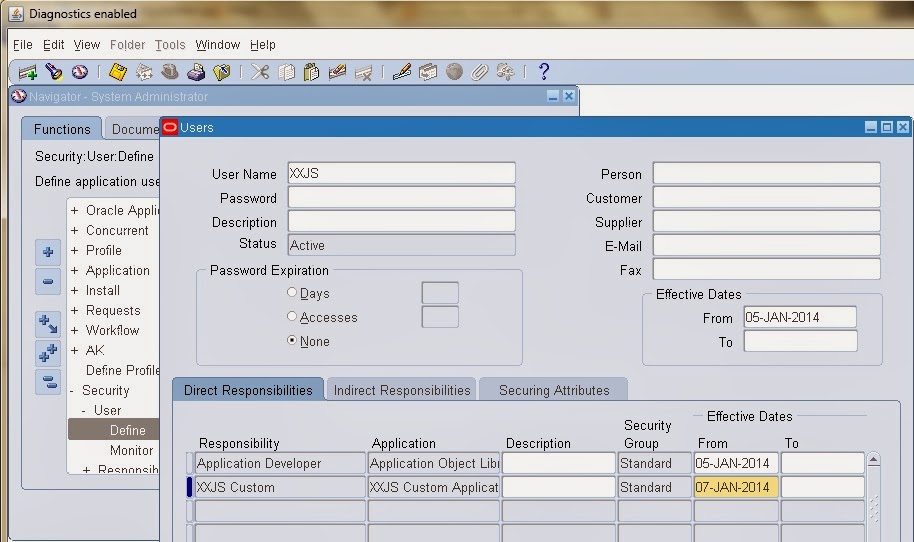
11.  Assign responsibility to application user (XXJS)
Navigation: System Administrator > Security > User > Define
Query User Name as XXJS.
Attach responsibility XXJS Custom


[oraerp@ebsr12 ~]$ sqlplus xxjs/xxjs
SQL>SELECT * FROM fnd_user_resp_groups WHERE user_id = (SELECT user_id FROM fnd_user WHERE user_name='XXJS');
SQL>SELECT * FROM fnd_responsibility_vl WHERE responsibility_id IN (
SELECT responsibility_id FROM fnd_user_resp_groups WHERE user_id = (SELECT user_id FROM fnd_user WHERE user_name='XXJS'));

12.  Other Considerations
Now, you are able do followings:
12.1 Log in to EBS as XXJS user, where database objects such as tables, index and sequence can be created in XXJS schema, then grant all privilege on XXJS objects to APPS
12.2 Log in to EBS as APPS user, create synonym for each object of XXJS objects
12.3 Report would be deployed under $XXJS_TOP/reports/US
13.4 Form would be deployed under $XXJS_TOP/forms/US


Friday, December 27, 2013

Developing XML/BI Publisher report based on PL/SQL Stored Procedure in Oracle Apps

Steps for Developing XML/BI Publisher report based on PL/SQL Stored Procedure

1.  Develop PL/SQL program in DEV instance of Oracle Apps as per user requirements by using SQL*Plus or TOAD or any other Oracle database Client
Example:
Package Name: XXJS_PLSQL_XML_PKG
CREATE OR REPLACE PACKAGE xxjs_plsql_xml_pkg
AS
   PROCEDURE xxjs_main_proc (x_errbuf       OUT VARCHAR2, x_retcode      OUT NUMBER);
END xxjs_plsql_xml_pkg;
/

CREATE OR REPLACE PACKAGE BODY xxjs_plsql_xml_pkg
AS
   PROCEDURE xxjs_main_proc (x_errbuf       OUT VARCHAR2, x_retcode      OUT NUMBER)
   IS
      l_qryCtx    DBMS_XMLGEN.ctxHandle;
      l_result    CLOB;
      l_no_rows   NUMBER;
   BEGIN
      FND_FILE.put_line (FND_FILE.LOG, 'XML Generating Started ..................................');
      l_qryCtx :=DBMS_XMLGEN.newContext (
            'SELECT * FROM all_objects WHERE object_type=''TABLE'' AND object_name LIKE ''GL_JE%''');

      LOOP
         -- save the XML into the CLOB field
         l_result := DBMS_XMLGEN.getXML (l_qryCtx);

         EXIT WHEN DBMS_XMLGEN.getNumRowsProcessed (l_qryCtx) = 0;

         -- store the XML as an output
         fnd_file.put_line (fnd_file.output, l_result);
      END LOOP;

      DBMS_XMLGEN.closeContext (l_qryCtx);

      FND_FILE.put_line (FND_FILE.LOG, 'XML Generating End ..................................');
   EXCEPTION
      WHEN OTHERS
      THEN
         DBMS_OUTPUT.put_line ('Errors: ' || SQLERRM);
   END xxjs_main_proc;
END xxjs_plsql_xml_pkg;
/

2.  Create “Executable” for the report (XXJSPLSXMLREP)
Navigation: System Administrator or Application Development > Concurrent > Executable

Executable: XXJSPLSXMLREP
Short Name: XXJSPLSXMLREP
Application: XXJS Custom Application
Description: My Custom Report Using PL/SQL & BI Publisher
Executable Method: PL/SQL Stored Procedure
Executable File Name: XXJS_PLSQL_XML_PKG.XXJS_MAIN_PROC

3.  Create “Concurrent Program” and attach this executable to this concurrent program and define parameters if required
Navigation: System Administrator or Application Development > Concurrent > Program

Program: My Custom Report Using PL/SQL & BI Publisher
Short Name: XXJSPLSXMLREP
Application: XXJS Custom Application
Description: My Custom Report Using PL/SQL
Executable Name: XXJSPLSXMLREP
Output Format: XML

4.  Create “Request Group” or Attach Concurrent Program to existing Request Group
Navigation: System Administrator > Security > Responsibility > Request
Search Request Group (Ex. Applications: XXJS Custom Application) and Add created concurrent program on Name

5.  Log in to Oracle Apps by your user
Navigation: XXJS Custom Application > View > Request
Submit New Request for concurrent program "My Custom Report Using PL/SQL & BI Publisher"
After Completion, Click on Output button and save output into your local PC as .xml file (test.xml)

6.  Create Template file using BI Publisher (XML/BI Publisher must be installed on local PC to create template file)
      i. Lunch MS Word & Load XML file (test.xml)
        Navigation: MS Word > Add-Ins > Data > Load XML Data

      ii. Create tabular report
        Navigation: MS Word > Add-Ins > Insert > Table/Forms > Wizard
  Here create tabular report using wizard and save it as XXJSPLSXMLREP.rtf


7.  Register this template using XML Publisher Administrator
      i. Create Data Definition (Navigation: XML Publisher Administrator> Data Definition > Create Data Definition)
     Name: My Custom Report Using PL/SQL & BI Publisher
     Application: XXJS Custom Application
     Code: XXJSPLSXMLREP

     ii. Create Template (Navigation: XML Publisher Administrator> Data Definition > Create Data Definition)
     Name: My Custom Report Using PL/SQL & BI Publisher
     Application: XXJS Custom Application
     Default File: XXJSPLSXMLREP.rtf (need to upload this file)
     Default File Language: English
     Code: XXJSPLSXMLREP
     Data Definition: My Custom Report Using PL/SQL & BI Publisher
     Default Output Type: PDF

8.  Log in to Oracle Apps
Navigation: XXJS Custom Application > View > Request
Submit New Request for concurrent program “My Custom Report Using PL/SQL & BI Publisher”

Procure to Pay (P2P) Cycle

Procure to Pay (P2P) Cycle:
Procure to Pay Cycle is one of the comprehensive and integrated process in Oracle E-Business Suite (EBS) that needs to meet any company's requirements like manual purchase orders to procure items, receipts that are matched to invoices when they are delivered and payments against invoices.

Demand (Purchase Requisition) -> Order (Purchase Order)-> Receive (Receipts) -> Enter (Invoice) -> Pay -> Transfer to General Ledger

1.  Create Requisition:
Requisition is a purchasing document which will be prepared by Employee whenever he/she required the goods or services.
Navigation: Purchasing > Requisitions > Requisitions
Tables:
·         PO_REQUISITION_HEADERS_ALL (segment1 column in table represent requisition number)
·         PO_REQUISITION_LINES_ALL
·         PO_REQ_DISTRIBUTIONS_ALL
Note: requisition_header_id is the link between po_requisition_headers_all and po_requisition_lines_all requisition_line_id is the link between po_requisition_lines_all and po_req_distributions_all

2.  Create Purchase Order:
Purchase Order (PO) is a main document which will be prepared and approved by the Buyer and send it to the Supplier.
Navigation: Purchasing > Purchase Orders > Purchase Orders

There are 4 types of Purchase Orders:

Standard PO
Planned PO
Blanket PO
Contract PO
Terms and Conditions
Yes
Yes
Yes
Yes
Goods or Service Known
Yes
Yes
Yes
No
Pricing Known
Yes
Yes
May be
No
Quantity known
Yes
Yes
No
No
Account Distributions Known
Yes
Yes
No
No
Delivery Schedule Known
Yes
May be
No
No
Can be Encumbered
Yes
Yes
No
No
Can Encumber releases
N/A
Yes
Yes
N/A
1. Standard PO: A Standard PO is created for one–time purchase of various items
2. Planned PO: A Planned PO is a long–term agreement committing to buy items or services from a single source. You must specify tentative delivery schedules and all details for goods or services that you want to buy, including charge account, quantities, and estimated cost.
3. Blanket agreement: A Blanket PO is created when you know the detail of the goods or services you plan to buy from a specific supplier in a period, but you do not know the detail of your delivery schedules.
4. Contract agreement: Contract purchase agreements are created with your suppliers to agree on specific terms and conditions without indicating the goods and services that you will be purchasing

Tables:
·         PO_HEADERS_ALL
·         PO_LINES_ALL
·         PO_DISTRIBUTIONS_ALL (REQ_HEADER_REFERENCE_NUM in Distributions table is the Requisition number for this PO)
·         PO_LINE_LOCATIONS_ALL
·         PO_LOOKUP_CODES

Note: po_header_id is the link between all these tables

3.  Create Receipt:
Receipt is the document that will be used to find out the quantity supplied by Supplier.
Navigation: Purchasing > Receiving > Receipts

Tables:
·         RCV_SHIPMENT_HEADERS
·         RCV_SHIPMENT_LINES (Lines Table has PO_HEADER_ID)
·         RCV_TRANSACTIONS
Note: shipment_header_id is the link between rcv_shipment_headers and rcv_shipment_line po_header_id   is the link between rcv_shipment_headers and rcv_transaction
Match Approval Level:
Two–Way: Purchase order and invoice quantities must match within tolerance before the corresponding invoice can be paid.
Three–Way: Purchase order, receipt, and invoice quantities must match within tolerance
before the corresponding invoice can be paid.
Four–Way: Purchase order, receipt, accepted, and invoice quantities must match within tolerance before the corresponding invoice can be paid.

4.  Create Invoice in Payables:
Invoice is a document that will be created to pay the Supplier. 
Navigation: Payables > Invoices > Entry > Invoices
There are 8 Types of Invoices:
1. Standard Invoice. 
2. Debit Memo. 
3. Credit Memo. 
4. Expense Report Invoice. 
5. PO Default Invoice.
6. Quick Match Invoice.
7. Fixed Invoice. 
8. Prepayment

Tables:
·         AP_INVOICES_ALL
·         AP_INVOICE_DISTRIBUTIONS_ALL
Accounting Entries Tables:
·         AP_ACCOUNTING_EVENTS_ALL
·         AP_AE_HEADERS_ALL
·         AP_AE_LINES_ALL
Note: invoice_id is the link between ap_invoices_all and ap_invoice_distributions_all

5.  Making a Payment:
Payment is created against the Invoice(s).
Navigation: Payables > Payments > Entry > Payments

Tables:
·         AP_INVOICE_PAYMENTS_ALL
·         AP_PAYMENT_SCHEDULES_ALL
AP Check's Information 
·         AP_CHECKS_ALL
·         AP_CHECK_FORMATS
·         AP_TERMS

6.  Transfer to General Ledger:
Navigation: Payables Responsibility > View Requests
Run the concurrent program “Payables Transfer to General Ledger” with the required parameters.
Table:
·         GL_INTERFACE

Journal Import:
Navigation: General Ledger > Journal> Import> Run

Tables:
·         GL_JE_BATCHES
·         GL_JE_HEADERS
·         GL_JE_LINES

Posting:
Navigation: General Ledger> Journals> Post
Table:
·         GL_BALANCES.